Push Notification Setup - Firebase
This tutorial will walk you through the steps to configure Firebase Cloud Messaging (FCM) with brainCloud.
Prerequisites
- Must have created an app on the Firebase console
Step1: Configure FCM cloud messaging server-key to brainCloud
- Navigate your browser to the Firebase console and select your project. Click the Settings Icon -> “Project settings” in the top left nav bar.


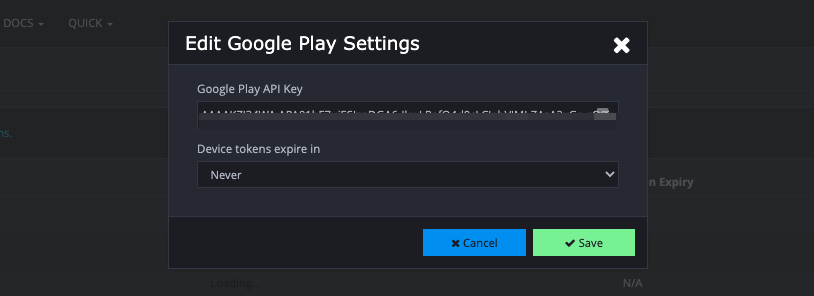
- Navigate to the brainCloud development console Design | Notification | Settings page, click Edit Settings.

Step2: Register a notification token to your device via your app
- Use the Keystore file of your Android app to create a fingerprint SHA1 and add it to your Firebase project.

- Download
google-services.jsonfile and add it to your approotfolder (for Unity will underAssetsfolder). This file contains most of the credentials you’ll need to connect your app to Firebase.

- Follow the
SDK Instructionto finish settings for your app. (If you are using the Unity Firebase Messaging package, after importing, yourAssetsfolder should similar to the structure below)

- In your app, after authenticating a user with brainCloud, you will need to register the
Firebase Registration tokenwith brainCloud. Specifically, you’ll want to call the RegisterPushNotificationDeviceToken() method to pass in the token. - If you are using Unity SDK, your code should be similar to the following.
    void InitializeFirebase()
    {
        Firebase.Messaging.FirebaseMessaging.MessageReceived += OnMessageReceived;
        Firebase.Messaging.FirebaseMessaging.TokenReceived += OnTokenReceived;
        isFirebaseInitialized = true;
    }

...
    public virtual void OnTokenReceived(object sender, Firebase.Messaging.TokenReceivedEventArgs token)
    {
        DebugLog("Received Registration Token: " + token.Token);
        firebaseToken = token.Token;
        AddStatusText("Received Registration Token: " + token.Token);
    }
...
    public void OnRegisterToken()
    {
        _bc.PushNotificationService.RegisterPushNotificationDeviceToken(Platform.GooglePlayAndroid, firebaseToken, authSuccess_BCcall, authError_BCcall);
    }
...
- If using Java Android studio
  FirebaseInstanceId.getInstance().getInstanceId()
  .addOnCompleteListener(new OnCompleteListener<InstanceIdResult>() {
      @Override
      public void onComplete(@NonNull Task<InstanceIdResult> task) {
          if (!task.isSuccessful()) {
              Log.w(TAG, "getInstanceId failed", task.getException());
              return;
          }

          // Get new Instance ID token
          String token = task.getResult().getToken();
          _bc.GetWrapper().getPushNotificationService().registerPushNotificationToken(Platform.GooglePlayAndroid, token, theCallback);
      }
  });
Step3: Test
- Run your app, authenticate an end-user to brainCloud and call RegisterPushNotificationDeviceToken() method to register device token.

- Once your test device is registered the notification token to brainClound from your app, you can check it from the User Monitoring | User Summary page.

- Hit
Send Notificationbutton from the above page will pop-up aSend Notificationwindow, fill some text and ClickSend. Your test device should receive this notification from brainCloud. You can always use brainCloud Push Notification methods to test push notifications too.
